Difference between revisions of "NML:Item"
(→Graphics block: Add note about cargo-specific graphics) |
Planetmaker (talk | contribs) (→Livery override: make more clear that an livery_override block works basically the same as a graphics block) |
||
| Line 49: | Line 49: | ||
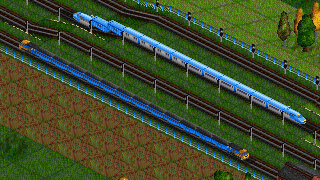
[[Image:NML liveryoverride.png|frame|left|Same cars, different engine, different car sprites]] |
[[Image:NML liveryoverride.png|frame|left|Same cars, different engine, different car sprites]] |
||
| − | A livery override block offers the option to change the look and behaviour of a wagon depending on the engine it is attached to. It is basically the same as a graphics-block |
+ | A livery override block offers the option to change the look and behaviour of a wagon depending on the engine it is attached to. It is basically the same as a graphics-block and its syntax is the same. The difference is that it only applies to a particular combination of an engine and a wagon. E.g. passenger wagons could adapt their livery to match the engine, to make the consist look like a multiple-unit train. The spritegroup needs to be defined before it can be used in a livery override. A livery override block is always part of the engine definition and looks like |
livery_override (vehicleID) { |
livery_override (vehicleID) { |
||
| + | callback_name: switch_name; |
||
| ⚫ | |||
| + | callback_name2: return value; |
||
| ⚫ | |||
} |
} |
||
Revision as of 13:02, 19 January 2012
Vehicles, Stations, Canals, Bridges, Towns, Houses, Industries (Tiles), Cargos, Airports+Tiles, Objects, Railtypes, Roadtypes, Tramtypes, Terrain
General
item (<expression> [, <ID> [, <expression>]]) {
	(<property-block>|<graphics-block>|<livery_override-block>)+
}
The first argument is the feature of the item, the second (optional) argument is the name used to identify the object throughout the NML file and the third (optional) argument is the numerical id you want to use for this item. Example:
 item (FEAT_ROADVEHS, hereford_tram) {
 	property {
 		name:               string(STR_NAME_HEREFORD_TRAM);
 		climates_available: ALL_CLIMATES;
 		introduction_date:  date(1940,1,1);
 		speed:              60 km/h;
 	}
 }
Property block
property {
	(<ID>: (<string>|(<expression> [<unit>]));)+
}
This one looks a lot more complicated than it actually is. A property-block contains one or more assignments. Each assignment starts with the name of the property that is changed followed by a colon. After the colon follows the value and you end the line with a semicolon. The type of the value depends on the property, some properties require a string as value and some an expression. For some properties you can optionally specify a unit that is used to convert the value to the unit that is written to the output file. You can only use a unit if the expression is constant. List of valid units
Graphics block
A graphics block must be placed in an item-block. It allows to define the graphics for a particular item, as well as various callbacks. Callbacks are used to define various things at run time, based on information (variables) of the item itself. This provides a much greater degree of flexibility than setting properties. An example (using fictional callback names):
     graphics {
         callback_a: switch_a;
         callback_b: return 42 + some_var;
         default: some_spritegroup;
     }
The callbacks that are available differ per feature, refer to the feature-specific pages for more information. The 'default'-callback is usually used to resolve the graphics. For each callback a return value may be specified, in the same way as for switch-blocks. Note that all callbacks have to be defined in a single graphics-block.
For vehicles and stations, a cargo type (identifier from the cargo table) may be used as callback name, to provide cargo-specific graphics.
Livery override
A livery override block offers the option to change the look and behaviour of a wagon depending on the engine it is attached to. It is basically the same as a graphics-block and its syntax is the same. The difference is that it only applies to a particular combination of an engine and a wagon. E.g. passenger wagons could adapt their livery to match the engine, to make the consist look like a multiple-unit train. The spritegroup needs to be defined before it can be used in a livery override. A livery override block is always part of the engine definition and looks like
livery_override (vehicleID) {
	callback_name: switch_name;
	callback_name2: return value;
	default: spritegroup_name;
}
For an example see the spritegroup
